Since the introduction of the iPhone, its cameras have come a long way. These days, you almost have to try to take a bad photo. Cameras on the latest devices rival their more traditional counterparts, despite space limitations. However, the default Camera app lacks the tools that serious and hobby photographers need to truly control their art. This is where third-party apps come in. Navigating the myriad of options in the App Store can be confusing, so we’ve done a quick comparison to help you decide between two top contenders: Photon Camera or Halide Mark II. Disclaimer: We make Photon Camera.
At a glance, Photon and Halide may look incredibly similar, but at their core there are different philosophies for how photos are treated and what their users presumably want. That’s not to say either one is right or wrong, good or bad, but since different people might have different aims for the photos, one or the other may have slightly more appeal.
The Similarities
Photon Camera and Halide (I’ll leave off the Mark II for brevity), are very similar in a lot of ways. Both are flexible in the format of your photo, handling not only RAW, and ProRAW, but also HEIC and JPEG. Both allow full manual control over focus and exposure. Both offer standard shooting tools including a timer, grid, level, focus-peaking, exposure clipping and histogram view. This is to say, that both apps function well as manual cameras, and you are probably tired of hearing things that they both do. The real interest is what’s different.
The Differences
Macro Mode
Halide sports a macro mode that zips you into the closest focus, as a shortcut for taking extreme closeups. It decides which lens can focus the closest, swaps to it, and gives you some finer control over the focus in order to get a perfect shot. Then it also does something called “Neuro Macro” which uses AI to further enhance your close up. How does this stack up to Photon? Well you’ll have to choose the lens with the shortest focal distance yourself, and still manually focus after that. This approach aligns with Photon’s core values of offering the best RAW photo experience with minimal post-processing.
Save to External Media
Photon allows you to shoot your photos directly to an external hard drive, if you have a device that supports doing so. This allows you to cut out some time either downloading your photos, or waiting for them to sync from the cloud. Simply unplug your drive from your phone, plug it into your computer, and your photos are ready to edit. With Halide, the only option is to save to your Photo Library, which is also another way to save photos in Photon.
Manual Controls
Wait, didn’t I say both apps function well as manual cameras? I did, but they each approach this differently. Their philosophies diverge. While Halide aims to incorporate smart features, Photon prioritizes simplicity. Halide employs gestures and complex controls, which come with a significant learning curve.

In contrast, accessing the focus and exposure controls is very obvious in Photon. You have focus, shutter speed, ISO and white balance controls displayed in an intuitive way:
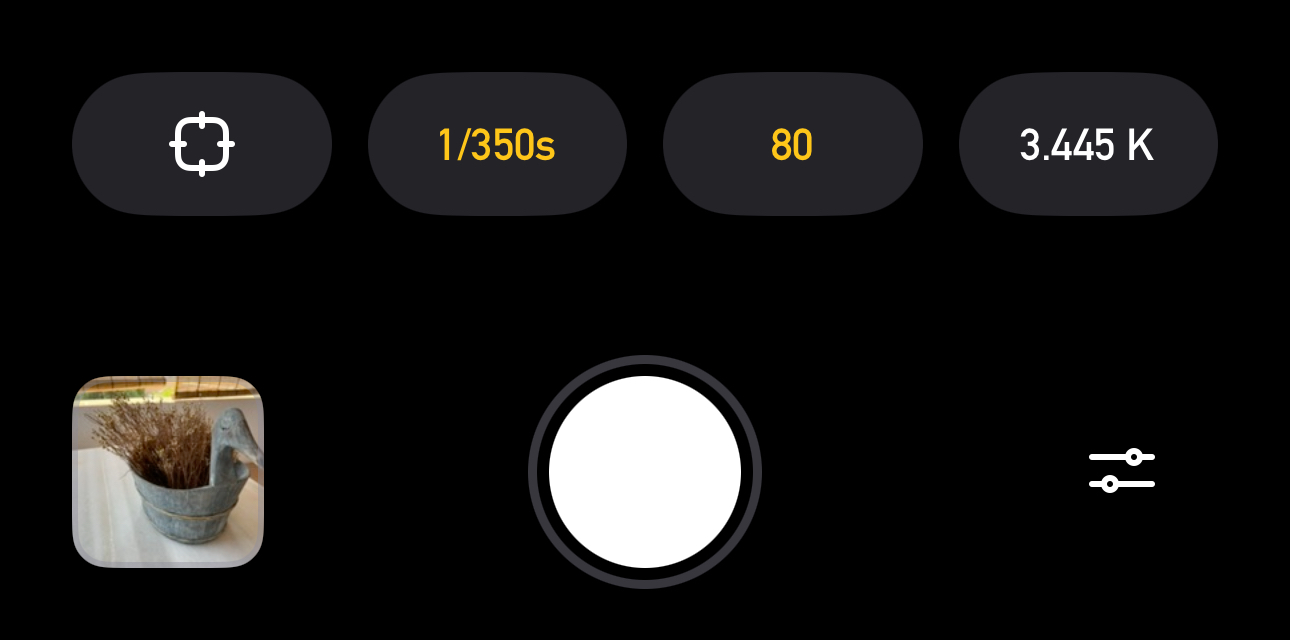
When you activate manual focus, exposure or white balance, you will immediately find the tools that go along with those options. In the case of focus, peaking and loupe. In the case of exposure, clipping and bracketing. In the case of white balance, the possibility to use a gray card.
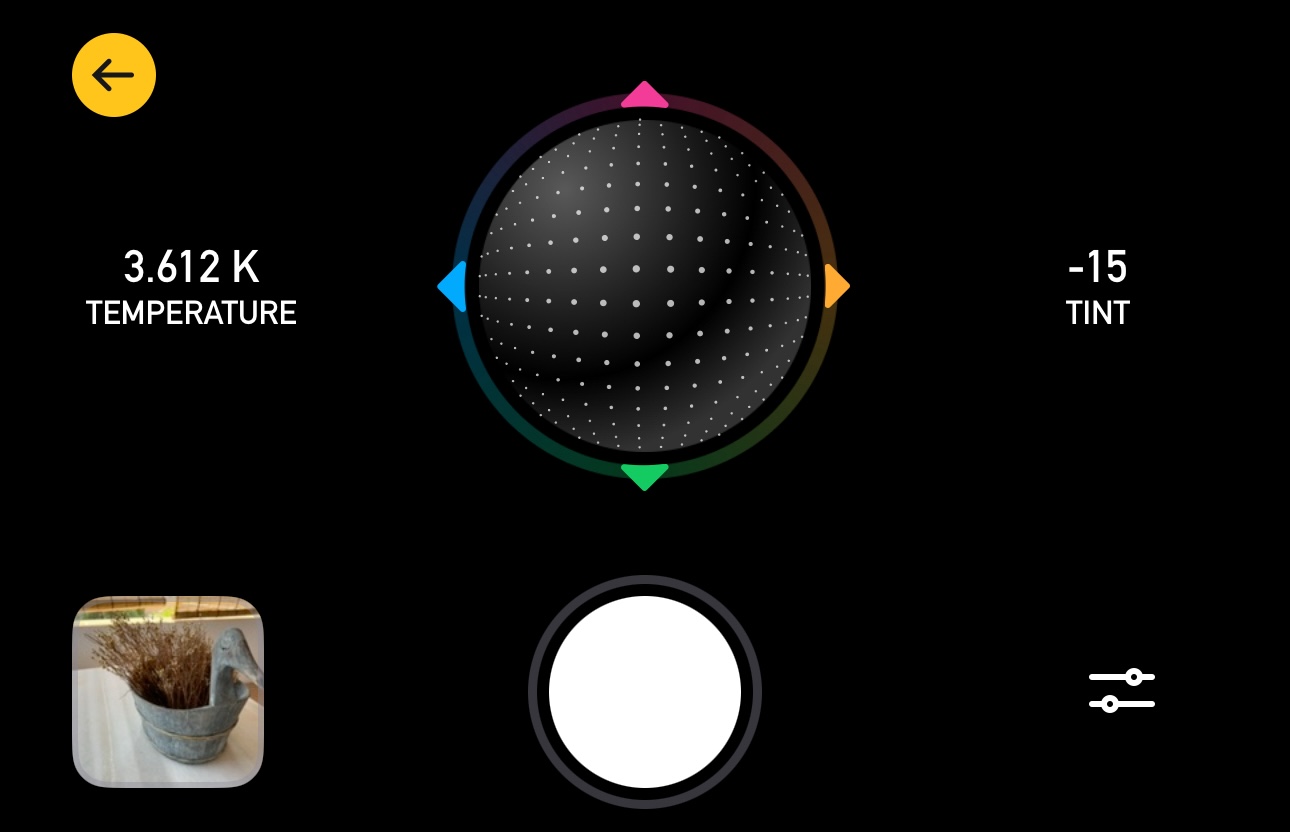
The most glaring difference is in the white balance controls. In addition to auto white balance, Halide offers 4 white balance presets to choose from that are tailored to the lighting around you. However it offers no actual manual control over white balance. On the other hand, Photon has a 3D white balance control sphere, which lets you move a ball on screen towards the colors you want your photo to be. If your photo’s too cold, moving it to the warmer, orange color will help. If it’s too green, moving toward magenta will solve that issue. This control is unique in that using the ball, you can adjust both axes of colors simultaneously.
Shooting User Interface
Each app has a couple of unique UI elements that are worth noting. In Halide, it’s possible to re-arrange some of your tools, giving you some latitude to customize your experience. Tools you use regularly can be put in an easy to reach spot, and less often used tools can be tucked neatly out of the way until they are needed. Photon doesn’t support any customization options at this time.
Keeping you informed is very important to Photon. We want you to know as much as possible about the photo you’re taking no matter what settings you’re using. That’s why Photon displays your exposure and white balance values even when it’s set to auto expose or auto white balance. Halide does not show any values for white balance, the shutter speed is only displayed when manual exposure is active, and ISO is only displayed when manual exposure is being adjusted.
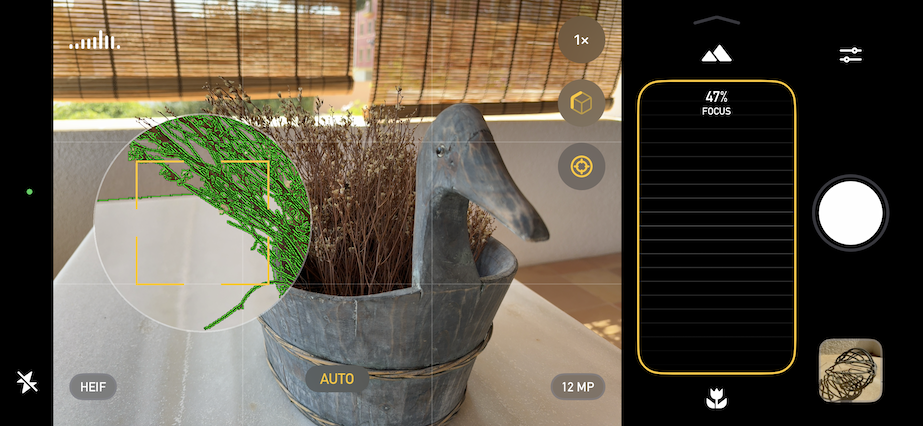
Additionally, it’s worth noting that the way Halide and Photon organize their controls is different. Halide places exposure controls in the top right “ear” of the device, while Photon has the focus, exposure, and white balance controls in a row below the viewfinder. While this makes little difference in absolute function, some may find one layout easier to work with than the other.
Photo Browser
Halide includes a full browser that lets you look at any photo in your library. Selecting a photo allows you to view information about the shot, favorite, delete, or share it. Photon has a slightly different take. You still have a browser that allows you to view info, favorite, delete, or share your photo, but the photos displayed are limited to the current session. This adds a bit of structure to the general workflow, as there are no photos from yesterday or the day before cluttering the menu, you can see exactly and only what you’re working on.
Conclusion
In conclusion, both Photon Camera and Halide offer robust features that cater to photographers looking for manual control over their iPhone photography. While they share some similarities, such as support for various photo formats and essential shooting tools, their differences highlight distinct philosophies and user experiences. Halide’s focus on smart features and customization options makes it ideal for those who appreciate flexibility. In contrast, Photon’s emphasis on simplicity and detailed manual controls, including unique tools like the 3D white balance control sphere and the ability to save directly to external media, appeals to users who prioritize hands-on control and a streamlined workflow. Ultimately, the choice between Photon and Halide will depend on your specific needs and preferences as a photographer.
Hopefully, this article has been helpful in deciding which one is right for you. However if you’re still on the fence and have questions about Photon, please drop us a note at support@latenitesoft.com, and we’ll be happy to answer you, add feature requests, and generally help you get the best iPhone photography experience we can!