This post covers how to use the wealth of manual controls that Photon gives you access to. See the image below for the location of each tool. On the main screen, any manual controls that have been adjusted will show up in yellow. If none have been used, Photon will be in Auto mode, and Auto will be yellow.
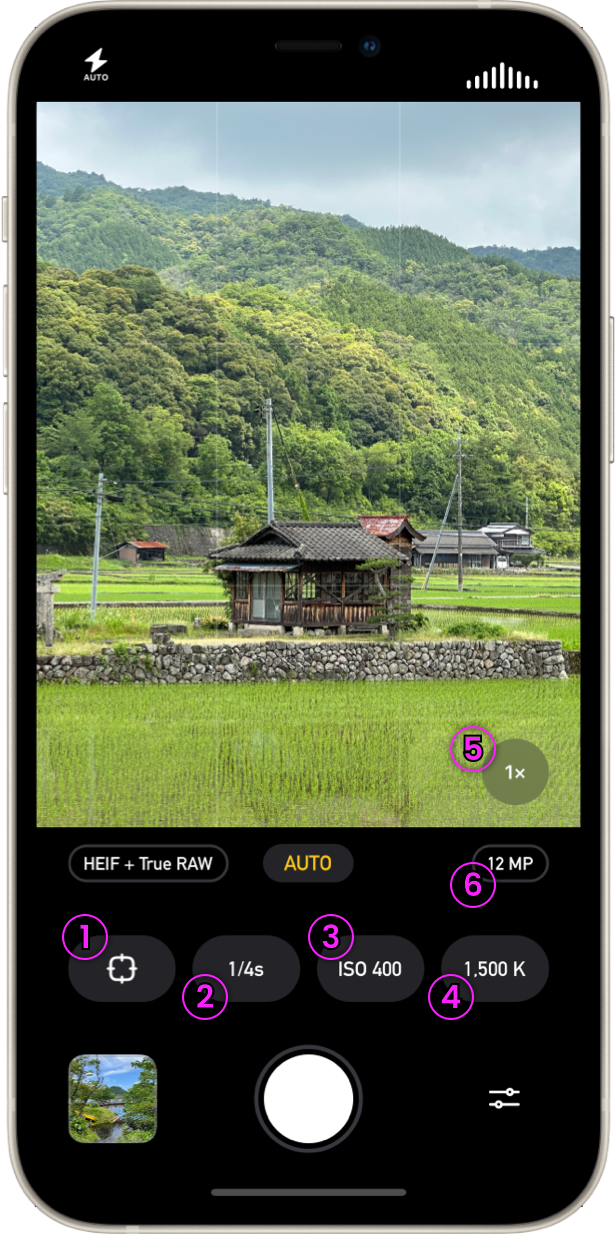
- Focus
- Exposure: Shutter Speed
- Exposure: ISO
- White Balance
- Lens Switcher
- Resolution Switcher
Focus
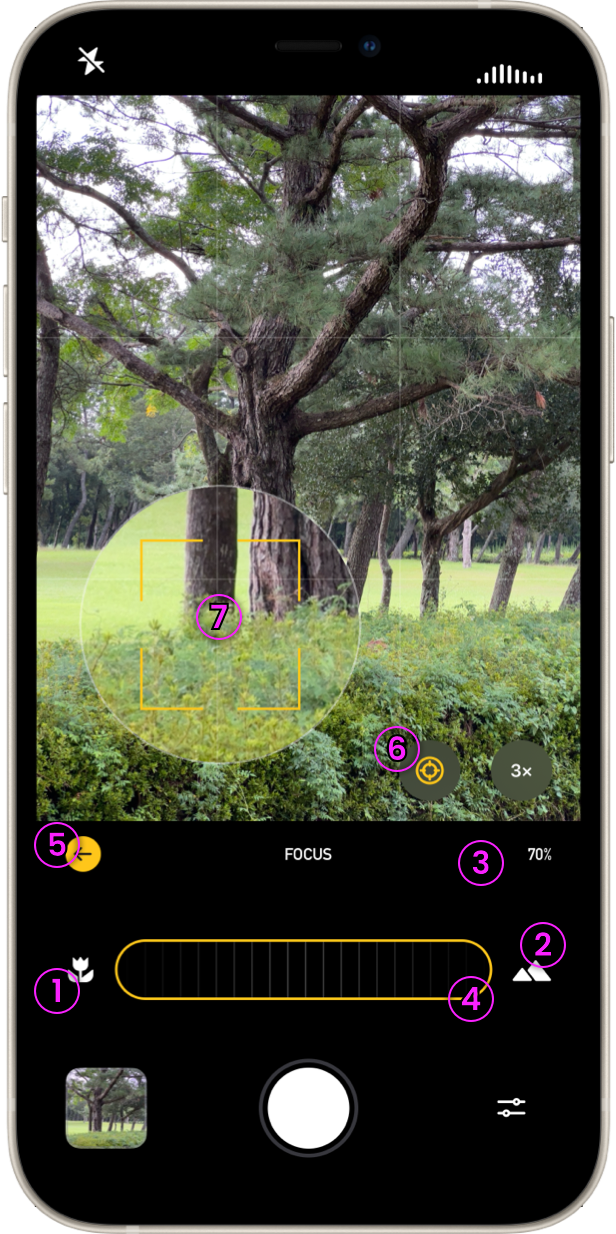
Tapping on the focus button presents you with a wheel that has a tulip (1) on the left and mountains (2) on the right. Sliding the wheel to the right will focus the camera on things closer to you, and sliding to the left will focus on things further away. A percentage meter (3) to the right of the Focus title will let you know at what point you are on the wheel, so you can gauge how much focal distance you have remaining and can adjust your position to the subject accordingly.
You can always go back to Auto Focus by tapping the “Auto” button (4) to the right of the wheel, which will only show up if the wheel has been used to set a focus manually. To go back to the main control screen, tap the yellow back arrow (5).
If you’re not a fan of manual focus but still want to give the camera a bit more direction, you can tap on what you’d like to be in focus on the screen and the Auto Focus will attempt to focus at that distance.
Additionally, if you’d like to see how your focus looks in a little more detail, you can turn on the Focus Loupe using the button (5) next to the Lens selector. This will display a magnified circle on the screen so you can get a better view (6). If you’d like to move it to a different part of your shot, simply tap on the screen where you’d like it.
Exposure
As you may have noticed above, Exposure is covered by two controls, Shutter Speed and ISO. Both control different aspects of how your photo will look.
Shutter Speed
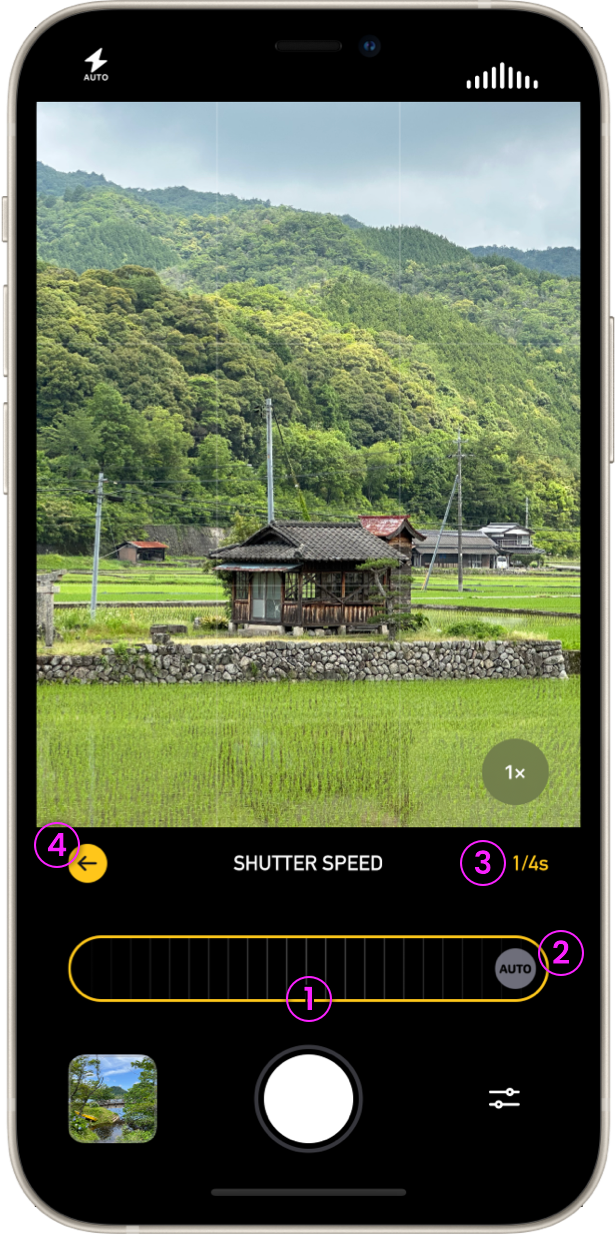
Shutter Speed is generally denoted as a fraction of a second. The higher the bottom number of the fraction, the faster the shutter speed will be. Photon allows you to choose anywhere between 1/1 (a whole) second, and 1/71428 of a second on the latest devices. But what does this mean for your photo? If you imagine the camera shutter as a window shade opening and closing, the shutter speed would be how fast that happens. Long shutter speeds let in more light, short shutter speeds let in less. This can have the effect of lightening or darkening your photo, but it also affects things like motion. A car driving across your frame with a long shutter speed may appear like a smear in your final image, while a short shutter speed will do a lot better job of catching it in the moment. Manipulating shutter speeds can be used to achieve various effects such as freezing or blurring waterfalls, and light painting.
Just as with the focus wheel above, when you tap on shutter speed, you will be presented with a wheel (1). Sliding the wheel to the left makes the shutter speed longer, and sliding it to the right makes it shorter. As before, once you turn the wheel, an auto button (2) will appear to allow you to reset it to auto. To the right of the title a fractional number (3) will appear to let you know your currently selected speed. Use the yellow back arrow (4) to return to the main screen. When you return, you’ll notice the speed you have selected is displayed in yellow, whereas an automatically selected speed displays in white.
ISO

The ISO number represents the camera sensor’s sensitivity to light. Photon currently supports ISO values between 32 and 2500. The higher the ISO, the more sensitive the sensor is to light. However this sensitivity comes at a cost. The higher the ISO the more noise is introduced into the photo. This can make your image look grainy or blocky.
When you tap on the ISO, you’ll be presented with another wheel (1). Slide it to the left to increase the ISO, and slide it to the right to decrease the ISO. The selected value is displayed to the right of the ISO title (3), and you can always use the auto button that appears in the wheel to return to automatic selection of ISO (2). Use the yellow back button (4) to return to the main settings. When you return the ISO you have manually selected will be displayed in yellow. Automatically selected ISO is always displayed in white.
White Balance
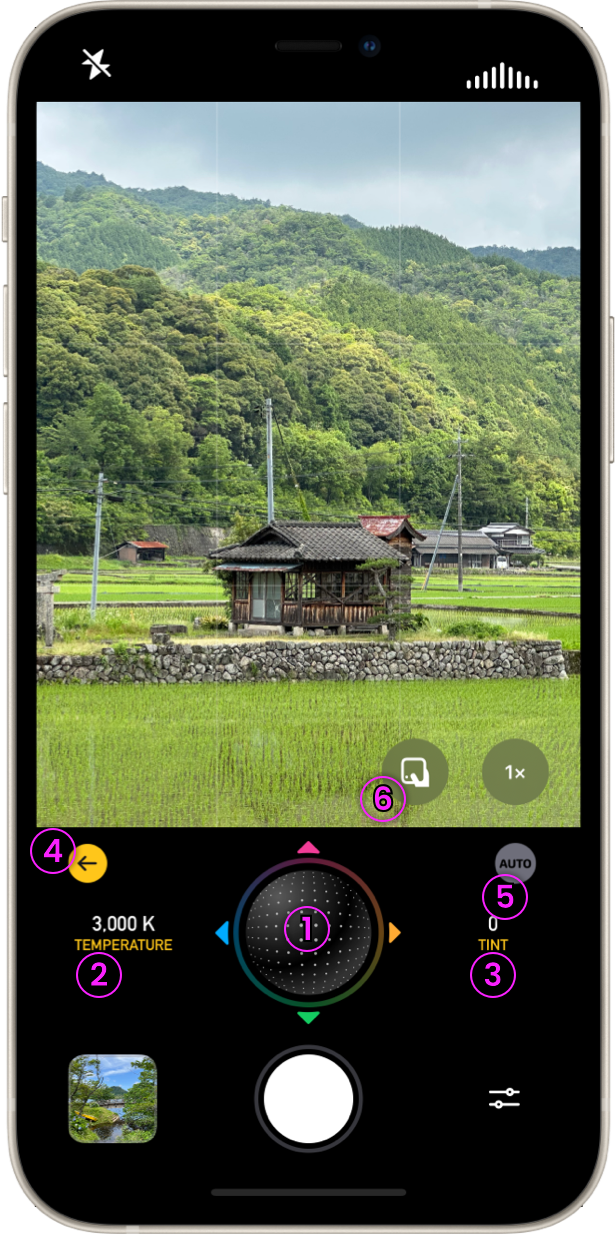
White balance adjusts how “cool” or “warm” your photo is. But what does that mean? Different lighting situations can make white look either more orangey/yellow or more blue depending on what kind of light it is, and the automatic white balance adjustment doesn’t always get it right. Have you ever taken a photo of your food that looked great at the time, but when you got home it came out really yellow and drab looking? Manual white balance is used to correct this and make whites “true”. Once you have something white looking correct, all the other colors should be adjusted correctly as well.
When you tap on the White Balance, you’ll be presented with a 3D ball (1) that controls the temperature and tint simultaneously. Sliding the ball to the left makes your shot “warmer” or more orange and sliding to the right makes it “cooler” or more blue. Moving the ball up and down adjusts the tint, up makes your photo more magenta, and down turns it more green. Once you’ve set a value, you can tap the auto button (5) that appears within the wheel to return to automatic adjustment of white balance. The selected value (2,3) appears to the right of the White Balance title, and you can use the yellow back arrow (4) to return to the main screen. Your selected value will show upon the main screen in yellow, and an automatically selected value will be shown there in white.
In addition to using the 3D ball control, if you have a neutral 18% gray card, you can use it to automatically set the white balance correctly for your lighting environment. To do this, tap the gray card button (6), center the gray card in the frame that appears, and tap confirm.
Aperture, Zoom, and Resolution
Aperture, also known as f-stop or f-number, is a method of measuring how large the opening that allows light onto the sensor is. Unfortunately with an iPhone or iPad, this size is fixed for each lens. There is some software that attempts to approximate the effects of changing the aperture through post processing with varying degrees of success, but with Photon the only way to change this value is to change to a different lens.
You may be wondering at this point, where is the zoom? Much like aperture above, all zoom methods that don’t involve changing lenses directly are software driven. This means that your photo is being digitally scaled up and then cropped to the desired size. This can lead to blurry, distorted, and noisy photos. Because of this, Photon does not offer zoom other than changing lenses. It is possible to achieve the same effect as digital zoom while you’re editing, and then you can use the method of your choice to scale your photo, so it looks its best and, more importantly, leaves the original photo intact.
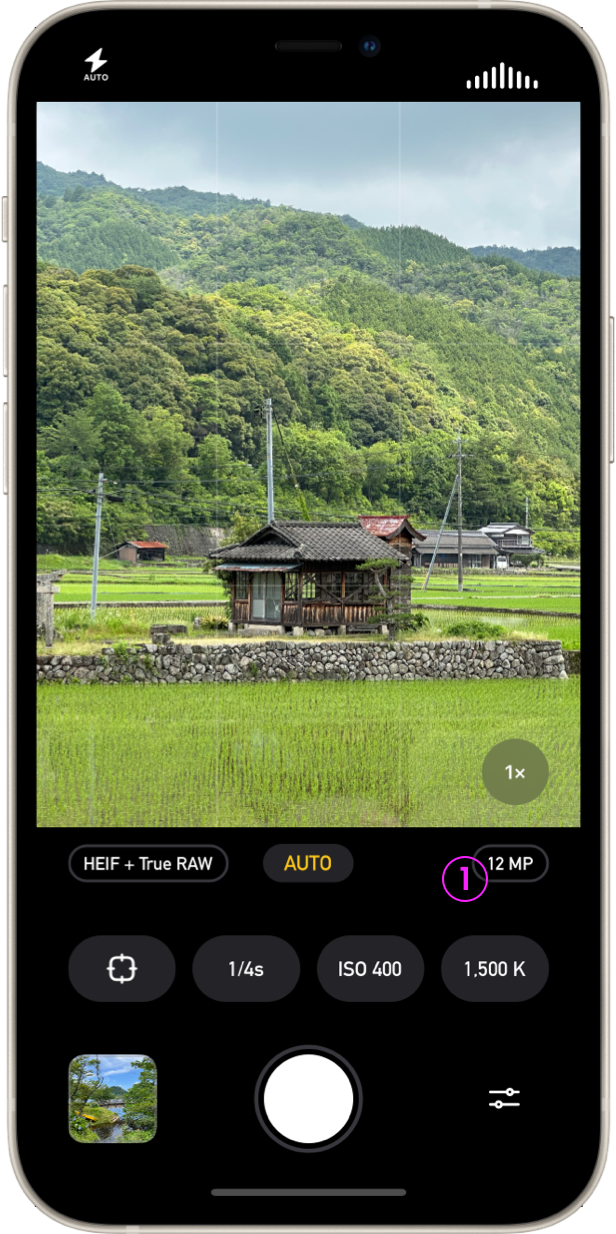
Photon offers two resolutions, 12 and 48 megapixels. While shooting, you won’t see a difference between the two on your device’s screen. But that doesn’t mean that higher resolution isn’t beneficial sometimes. If you’re planning on enlarging and then cropping your photo to get a zoomed effect, a higher resolution will give you a higher fidelity, more detailed photo. Additionally if you decide to print a photo in a large format, a higher resolution may be better, depending on how big. That being said, 48 megapixel photos are significantly larger than their 12 megapixel counterparts, and for every day use, 12 megapixel resolution is probably sufficient.
To quickly change the resolution, you can tap the button in the top right area of the tool bar (2). This will cycle between 12 and 48 megapixels. Please note that True RAW is not compatible with 48 megapixel capture. For more information about how to choose a format please see this post.